Showing posts with label d.i.y.. Show all posts

Sunday, September 9, 2018

Giant Watercolor Paint Box

Making a giant watercolor box for our art room was something I was inspired to do from Alex Crowder at Ms. Crowder's Art Studio. The cool connection here is that she took over my previous art teaching position in Georgia :) I know she is doing a great job and putting in all it takes (and then some) to give her students a great experience in learning about and making art!

Here's all you need for this easy-peasy, big-impact project your kids will love:

  • 6 Chinet paper plates
  • Tempera paints and a big easel brush 
  • A box lid or a big rectangular piece of foam core/cardboard 
  • Elmer's glue

I was lucky enough to spy a cardboard box lid that was just the right dimension for this giant paintbox set during our teacher prep week, however you can use a piece of foam core or cardboard and you will end up with the same effect. I just really like that there are edges on my paintbox to help with stability. 

Steps:
#1 - paint the cardboard box with white tempera paint
#2 - if you want your paintbox to look like it's gotten some use, water down some tempera paint and have fun splattering to your heart's content
#3 - while the box is drying, paint the paper plates to resemble the oval pan refills
#4 - line up your "paper plate paints" on top of the box and then glue in place
 VoilĂ 


Wednesday, March 18, 2015

Make a Flowerball Sculpture


Are you beginning to feel a bit of spring fever? Maybe you want to put together something bright and cheery for your room at school or home. I think I have a d.i.y. sculpture project that you'll enjoy making. All it takes to build one is a glue stick, a pair of scissors, a plastic lid, a pencil and 5 pieces (or more depending on how many colors you want) of colored copy paper. I found the project at Bloesomkids blog and after some trial and error, I was able to put one together. Through the pictures below, I will explain it to you as simply as possible. 


Step one: Fold each piece of copy paper in half the long way. You'll need 20 circles total to build your flowerball, so this takes some of the cutting work out of it for you. Take a lid, like one from a peanut butter jar or use a clean yogurt cup, and trace the circle twice on each piece of paper. You can use whatever size circles you want, but I suggest keeping it small the first time around. Keeping the paper folded, cut out each circle so you get two for every one you cut :) 
Step two: Now you need to work on the folds and make each circle into these cute little triangles.....
Fold in half lengthwise to make a taco, then again so you have a 1/4 piece of pie. This will make intersecting lines or creases. These creases are now your guidelines and you will see them once you open the circle back up for the next set of folds.
Now you will begin making the circles into those cute little triangles and you will use the creased guidelines to help you get everything just right. To begin, fold your paper as I have done above, bringing the edge of the circle up to the horizontal guideline and keeping the creases on top of one another.
The second fold is the trickiest in my opinion - you want really crisp corners all the way around. This fold should begin at the corner of that first fold and end at the next guideline that you run into. 
Finish out the equilateral triangle by folding the last edge of the circle. Watch the corners and again, get them as crisp as possible.
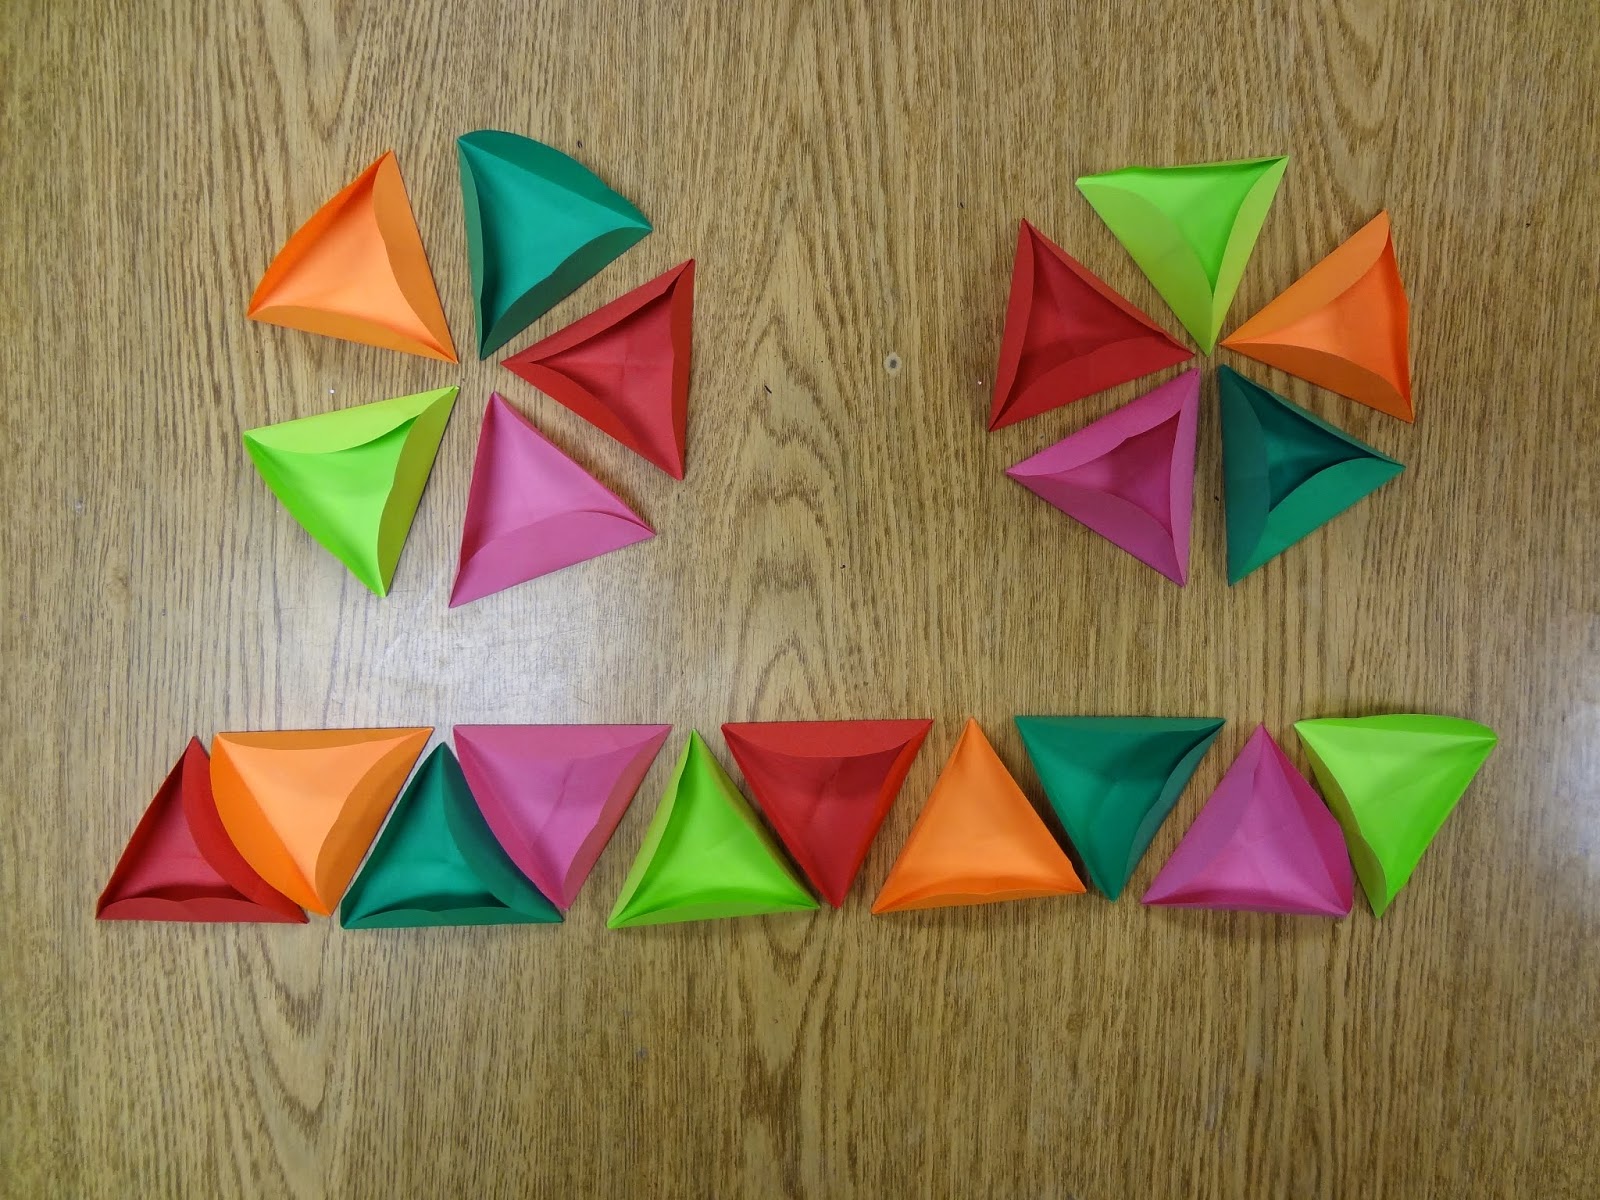
Step three: Arrange the triangles into three "pods" as above. The two circular sections are comprised of 5 triangles each with the corners facing in and the long row has 10 triangles with the "top" corners going up, down, up, down, etc. Use a glue stick to put them together and rub the edges together really well so they are "tight." 
Sorry about the change in colors.....
Step four: Take the long row of 10 triangles that are glued together and form them into a ring so that all of the flaps are on the outside of your ring and glue the two ends together.
Work on gluing the two "pods" of 5 together - this will form the top and bottom of the flowerball. The sections will rise up slightly as you glue them - don't worry, that's natural. Make sure the flaps stay on the outside.
Step five: Arrange one of the circular pods on top of the ring as you like and glue the flaps together - a flap from the ring and a flap from each circle will join up for a total of 5 times. Do the same for the remaining pod and the empty side of the ring and voila, you are done!! 

Wednesday, September 11, 2013

D.I.Y. Silhouette Project

Making an art project for my own pleasure doesn't seem to happen very much these days. However, when I can do something art-related for my husband that centers around our daughter, I always find the time! This was a very nice project that I found at Simple Art Project Ideas and it didn't take long at all. 


What I did was print out the picture as large as possible. Then I cut out the profile portrait of my daughter. I laid her profile on top of a piece of black construction paper and created my silhouette. Prior to this, I took some turquoise watercolor paint that I had made from old markers and painted onto watercolor paper. I used a paper towel to create a blotchy, cloud-like texture. Double sided tape was used to hold the silhouette in place! Easy!
Maybe you'll try something like this sometime.....

Friday, May 10, 2013

Teacher Workshop: Gelatin Prints


We had a printmaking workshop for teachers in the big green room yesterday! It was just what the doctor ordered for this time of the school year. This project was found at Cassie Stephens blogspot, so I owe all the credit to her! Making the gelatin for this printing project was not complex. I did store it in the refrigerator the first night after preparing it. The gelatin was poured into cookie sheets that I bought at the Dollar Store. So far, the gelatin has survived overnight without refrigeration after our first day workshop. Another group will be trying it today after school. The results are breathtaking! I really urge you to try it!


Monday, August 6, 2012

Summer Vacation

I was very fortunate to spend the weeks of summer with my little family in the state of Maryland. Being in close vicinity of D.C. and New York, I was able to tour the Guggenheim museum as well as the National Gallery of Art. And I am also proud to say I saw the fireworks from our nation's capital!! All in all, it was a great summer with lots of relaxation and site seeing.
I didn't have quite the amount of time I would have liked to have had to work on my own personal art, but when we got home, I did get to put together some projects that I had been eyeing on Pinterest :) I love that website so much.....great inspiration for sure...and if you aren't too careful, a real time muncher!

A chevron painting inspired by a print. It took quite a bit of obsession before I completely comprehended the whole pattern!

Yummy Jell-O Sky Cups for Phoebe's buddies at daycare. Really easy to make too!

Fun with re-positionable vinyl letters....

Negative space painting with magazine collage underneath....


Thursday, April 26, 2012

How to Make Recycled Crayons


I've been on a crayon making kick!! It's so fun! AND EASY!!

Step #1: Soak the old crayons in water. You'll be amazed how some of the wrappers just open right up within minutes. Some crayon labels are more stubborn than others and need to be scraped off.

Step #2: Place the crayons in a large plastic ziplock bag and break the crayons apart by hitting the bag with a hammer

Step #3: Preheat the oven to 250 degrees

Step #4: Begin placing the crayon bits into an old muffin tin (you won't be able to use it for food anymore)


Step #5: Place in the oven for about 30 minutes until all the wax melts

tep #6: Allow the wax to harden and cool (a few hours). Turn the pan over and out they will fall right out!!